How to Install a Rocker Light Switch for Your Home Upgrade Guide
In the modern home design landscape, lighting plays a crucial role in setting the ambiance and functionality of a space. One popular and stylish option for controlling your lighting is the Rocker Light Switch. As expert electrician Jane Doe states, "A Rocker Light Switch not only enhances the aesthetics of your home but also offers ease of use, making it a perfect choice for homeowners looking to upgrade their lighting systems." With its sleek design and simple operation, this switch has become a preferred choice for many homeowners.
Installing a Rocker Light Switch is a straightforward process that can significantly elevate the look and feel of your living space. Whether you are doing a complete home renovation or just looking to update outdated fixtures, understanding how to properly install a Rocker Light Switch can be a valuable skill. This guide will walk you through the steps needed to achieve a seamless installation, while also highlighting essential safety precautions and tips to ensure optimal performance. By embracing this simple upgrade, you can transform your home’s lighting into a sophisticated and functional component of your decor.
Tools and Materials Needed for Installing a Rocker Light Switch
When installing a rocker light switch, having the right tools and materials is essential for a smooth and successful process. You will need a few basic tools including a screwdriver, wire stripper, electrical tape, and a voltage tester. These tools will help you safely disconnect the power and connect the wires without any hassle. Additionally, having a level can assist in ensuring that your switch is aligned properly for a professional finish.
In terms of materials, you will need a rocker switch compatible with your home’s electrical system, as well as wire nuts for securing connections. Make sure to also grab some electrical tape to insulate any exposed wire. Having a small flashlight might be useful too, especially if you find yourself working in dim spaces like behind a wall or under cabinets.
**Tips:** Before starting, always turn off the electrical power to the switch at the breaker box to ensure your safety. It's also a good idea to label the wires before disconnecting them, making it easier to reconnect them correctly later. As you work, periodically check the alignment of your rocker switch with the level to ensure everything sits flush against the wall once installed.
How to Install a Rocker Light Switch - Tools and Materials Needed
| Item |
Description |
Quantity |
| Rocker Light Switch |
Standard 15A rocker switch |
1 |
| Screwdriver |
Flathead or Phillips, depending on screws |
1 |
| Wire Strippers |
To remove insulation from wires |
1 |
| Electrical Tape |
Insulate exposed wire connections |
1 roll |
| Voltage Tester |
To ensure power is off before work |
1 |
| Wire Connectors |
For connecting wires securely |
2-3 |
| Safety Goggles |
To protect eyes while working |
1 pair |
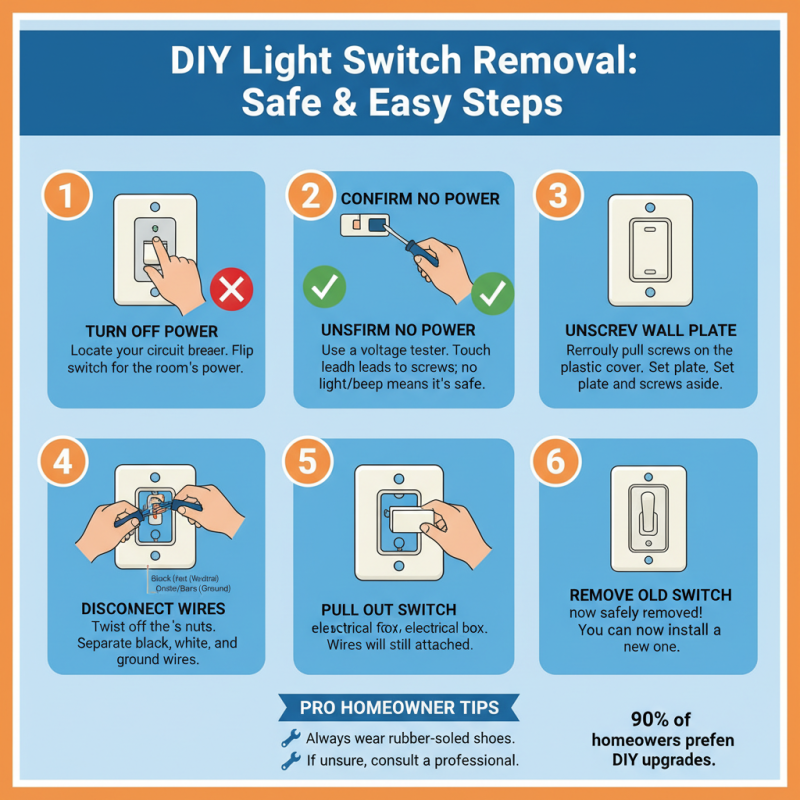
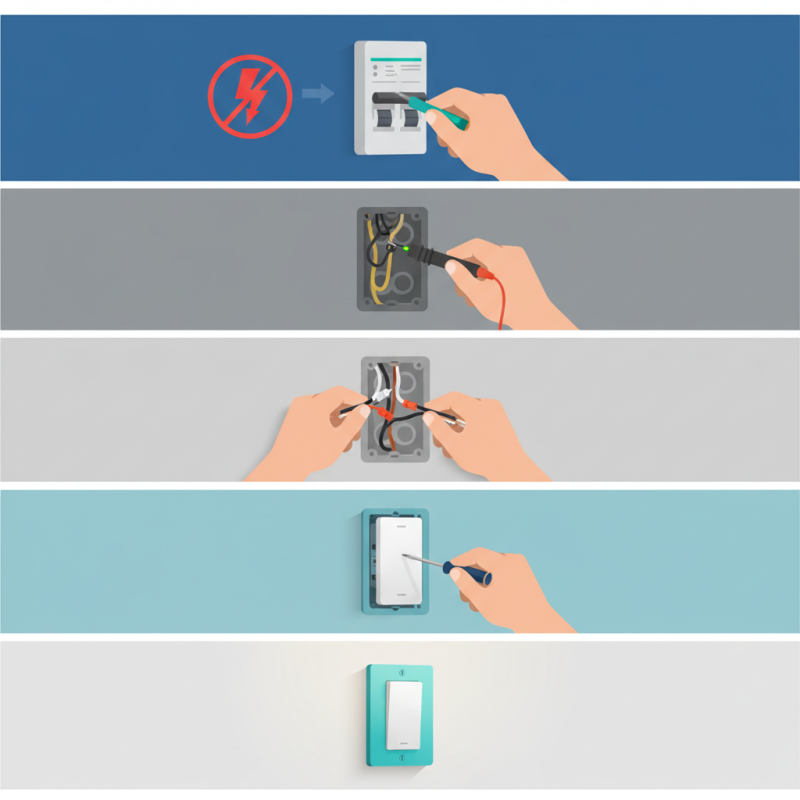
Step-by-Step Guide to Removing the Old Light Switch
Removing an old light switch may seem like a straightforward task, but understanding the proper steps can ensure both safety and efficiency. According to industry reports, approximately 90% of homeowners prefer DIY home upgrades, with light switches being one of the most common projects undertaken. It's crucial to begin by turning off the power at the circuit breaker to prevent any electrical hazards. Once the power is off, use a voltage tester to confirm that the current is not flowing to the switch.
Next, remove the switch plate cover using a screwdriver, and you'll find the screws securing the switch itself. Loosen these screws and gently pull the switch out from the electrical box. Carefully disconnect the wires; note their configuration for reinstalling the new rocker switch later. According to the Electrical Safety Foundation International (ESFI), improper handling of live connections can lead to severe injuries, highlighting the importance of ensuring the power is off during this process. Properly disposing of the old switch and ensuring all wiring is secure will set the stage for a successful installation of your new rocker switch.
Wiring the New Rocker Light Switch: Essential Connections
Wiring a new rocker light switch is a critical part of any home upgrade, providing not only aesthetic benefits but also enhancing functionality and energy efficiency. According to the National Electrical Contractors Association (NECA), improper wiring practices account for over 50% of electrical work failures, highlighting the importance of correct installations in any DIY project. The first step in wiring a rocker light switch involves ensuring that power is turned off at the circuit breaker to prevent any electrical shock. Properly identifying the live wire, neutral wire, and ground is essential. Generally, the live wire is black or red, while the neutral wire is white, and bare or green wires are used for grounding.
Once the power is off and wires are identified, the next step is to connect the wires to the rocker switch. The live wire must be attached to the designated terminal on the switch, typically marked for line connections. The neutral wire, while not connected to the switch, should be secured properly in the electrical box. NECA reports that having a professional inspect your connections can prevent potential hazards, considering that faulty wiring can lead to circuit overloads or electric fires. Proper grounding not only protects the switch but also the entire electrical system, ensuring a safe environment for your home.
Rocker Light Switch Installation: Wiring Essentials
Mounting the Rocker Light Switch and Securing the Plate
When it comes to home upgrades, installing a rocker light switch is a straightforward yet impactful enhancement. Mounting the rocker light switch requires careful attention to safety and a few essential tools. Start by turning off the power at the circuit breaker to avoid any electrical hazards. Using a voltage tester confirms that there is no electricity flowing to the existing switch. This step is crucial, as the Electrical Safety Foundation International (ESFI) highlights that improper handling of electrical installations can lead to over 30,000 injuries each year in the United States alone.
Once the power is off, remove the old switch from the wall. It's essential to note the wiring configuration for proper installation of the rocker switch. Typically, a rocker switch will feature a clear terminal layout, allowing for a straightforward connection of the hot wire, neutral wire, and ground. According to the National Electrical Code (NEC), ensuring secure and proper wiring not only enhances the performance of your switch but also adheres to safety standards that minimize fire risks and electrical failures.
After wiring the rocker switch, carefully mount it into the electrical box and secure it with screws. The cover plate should then be installed to provide a finished look while ensuring all electrical components remain safeguarded. The National Fire Protection Association (NFPA) reports that well-installed lighting fixtures and switches are significant contributors to reducing electrical failures in homes, ensuring that your installation adheres to best practices promotes both safety and aesthetic appeal. Observing these practices ensures that your home upgrade is not only functional but also safe and compliant with local electrical codes.
Testing Your Newly Installed Rocker Light Switch for Functionality
After you have successfully installed your rocker light switch, the next critical step is to test it for functionality.
First, ensure that the power is turned back on at the circuit breaker. This is crucial for both your safety and confirming that the switch operates correctly.
Take a moment to inspect the switch visually for any signs of misalignment or improper installation, such as any gaps between the wall plate and the wall itself.
With the power restored, flip the rocker switch up and down a few times.
Listen for any clicks or resistance, which could indicate an installation issue.
Additionally, observe the connected light fixture—check to see if it turns on and off seamlessly with the switch.
If the light operates as expected, your installation may be successful.
However, if you notice any flickering, delayed response, or if the light does not turn on at all, it's essential to turn off the power again and double-check the wiring connections.
Ensuring a secure and correct connection is key to a reliable and safe rocker light switch installation.